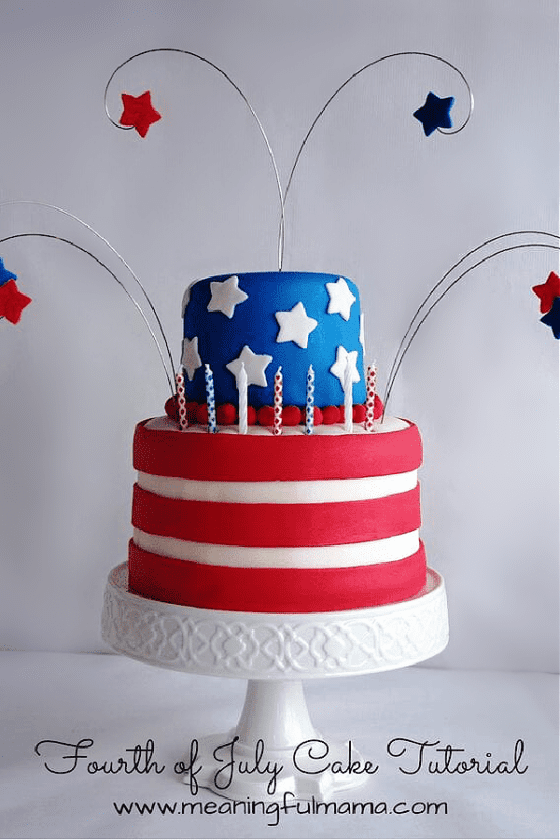
This Fourth of July cake tutorial can help you recreate the exact same cake. With step-by-step instructions, you will be equipped to make a spectacular 4th of July dessert.
Maybe you don’t want the exact same cake. That’s OK. There are tons of cake-decorating tips within this post or linked to within the post that can help you in your own cake-decorating ventures. The first post I encourage you to read is my cake baking 101 post.
Fourth of July Cake Tutoria
My daughter’s birthday is close to the Fourth of July, and this year she wanted to have an Independence Day theme for her, so that’s exactly what we did. This Fourth of July cake represented the beauty and meaning of the American flag on the outside, while having a surprise design on the inside.
I will teach you how to do it.


Note: Amazon affiliate links have been added for your convenience. Anything you buy through these links helps to support the free resources I provide at Meaningful Mama. Thank you for your support.
Step 1: Make the Stars for the Top of your Cake – It is best to make these a few days ahead so the fondant has time to dry on the end of your wire accessories. While I bought these at Michael’s a long time ago (a Duff product), I cannot seem to find them now. Therefore, you could make your own star wire toppers following this tutorial.
You can buy your fondant pre-colored in both red and blue. You will need fondant for you design, so it’s convenient and less expensive to use fondant.
Another option is to make the stars out of gum paste rather than fondant. Gum paste dries faster. I just used the fondant so I didn’t have to match colors and could save money.
You will need star cookie cutter to cut out your stars. Hook these onto the wires you made.

Step 2: Bake, Frost, and Fondant your Cakes – I made my cakes 8″ for the larger size and 5″ for the smaller size. I used my favorite white velvet cake recipe, coloring it in red, white, and blue.
You will need 4x the recipe, but you will have a bit extra cake for cupcakes. I also used my favorite buttercream recipe.
A post that will help you in baking your cakes is my Cake Making 101 post. It is chalked full of tips for baking a great cake.
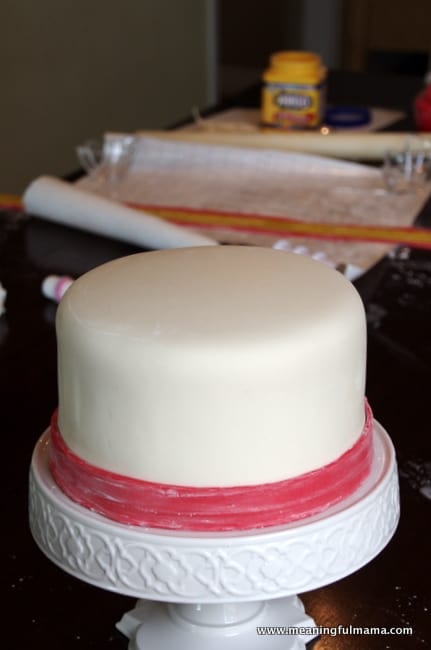
I obviously striped the bottom tier by alternating cake layers colored red and white, while the top tier alternated blue and white. The third picture above is a photo of my first layer of crumb coat. I do a crumb coat and then a thin finishing layer of frosting.
Next, it is time to fondant the cakes. I used white fondant to cover the bottom tier and blue fondant for the top. For a complete tutorial on how to fondant a cake, please visit my Cake Making 201 post.

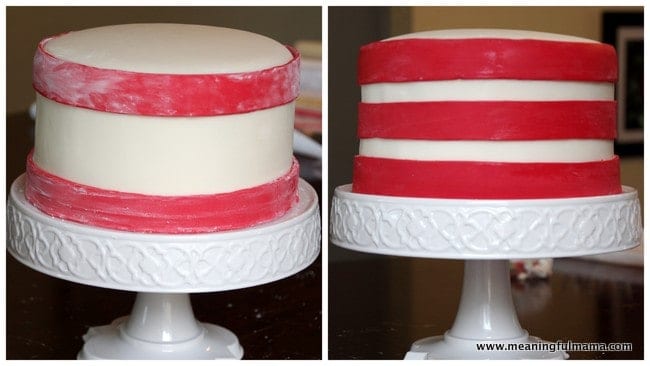
Step 3: Cut Your Stripes – Next you will want to make your stripes cut for the cake. I use cornstarch to make sure the fondant doesn’t stick to the roller or the mat.
The circumference for an 8″ cake is 25.14″, so you will want to make your stripes are rolled out that long. I used my Wilton fondnt roller to roll it out because it has guides to assure even thickness when rolling. I used the 1/16″ guide for thickness.
My stripes were 1 inch wide, which happened to be the width of my yardstick. I, therefore, just used a pizza cutter to cut down either side of the yardstick.
* Cake Decorator Tip: When using stripes for a cake, roll them up (like bubble gum tape) and then unroll them to attach to the cake. If you try and pick up the stripes without rolling, they begin to stretch and lose their consistent shape. See the third picture above.
Step 4: Attach Your Stripes to the Side of your Cake – See my decorator’s tip in Step 3 to know how to transfer your stripes from the mat to the cake.
The fondant sticks to itself when you add a little bit of water. Use a clean paintbrush to add a little bit of water along the base of the cake. Then, put on the bottom stripe by unrolling the fondant stripe into place.
Repeat this process with the top stripe. Then, center the middle stripe between the top and bottom stripe. I used the edge of a ruler to straighten up the stripes if there was any weird gapping or inconsistency.
* Cake Decorator Tip: This is a tip for if your cornstarch or powdered sugar you used for non-stick purposes adheres to the outside of your fondant and leaves a white film. Simply dip a paper towel in a little bit of Crisco and lightly rub it along the fondant to remove the residue. Don’t use too much. You can always add more.
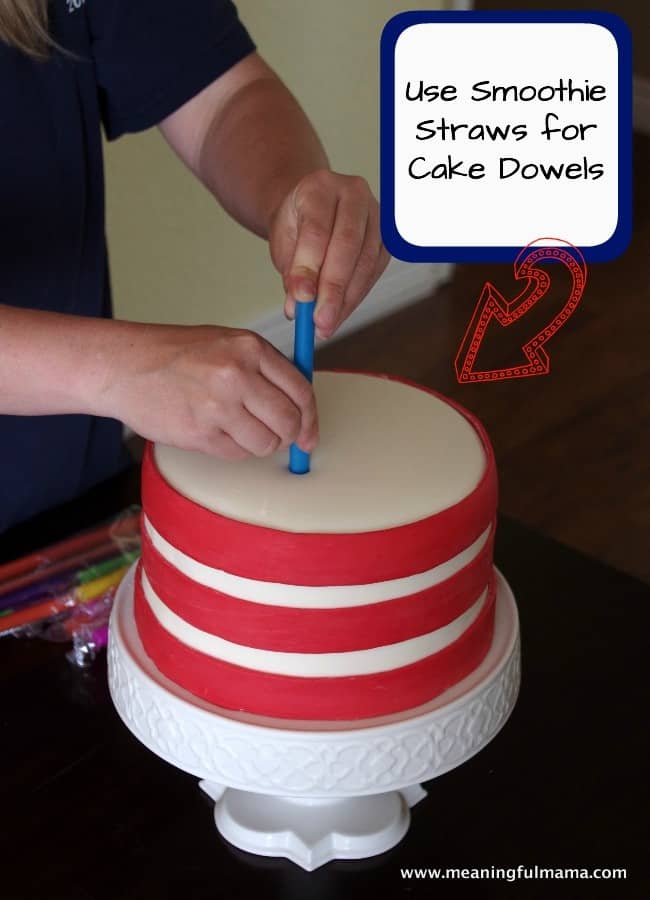
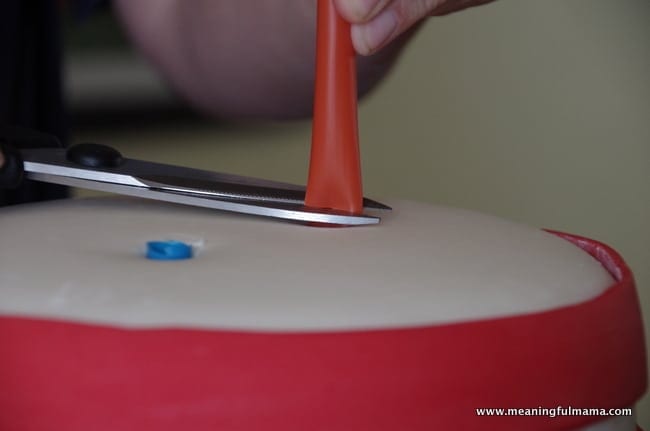
Step 5: Add “Dowels” to Create Stability to Your Cake When Tiered – When stacking cakes, it is important to add dowels to the layers underneath the top tiers to create stability.
Some people like to use wooden dowels. I, however, like to use smoothie straws, which can also be known as Bubble Tea straws or milkshake straws. These create plenty of stability.
They also cut off way easier than wooden dowels, which is why I prefer them.
I added 3 smoothie straws to this cake. You can do more straws if you are stacking more tiers. Once the straws are inserted and pushed down entirely, you can easily cut them to the level of the cake.
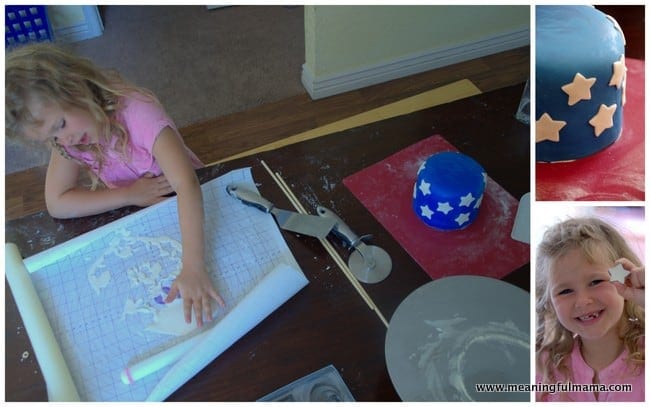
Step 6: Add Stars to the Top Tier – It is time to focus on the top tier. This one is easy because all you do is use a star cookie cutter to cut out the stars for your cake.
It is nice to have nesting star cookie cutters so you have a variety of sizes to choose from for various projects. As you can see, my daughter was able to do a lot of this tier.
Just cut out the stars and use a little bit of water on a clean paintbrush to add them to the cake.

Step 7: Stack Your Cake – I use a spatula to pick up my top tier. Then, I center it on the cake and quickly pull the spatula away so it falls into place.

Step 8: Add Balls as a Border – I like the look and ease of adding fondant balls as a border to a cake. Head on over to see a graduation cake I made with a brief tutorial on how to make perfect fondant balls.

Step 9: Add Your Wire Cake Accessories – It is time to add the fun stars you made that will shoot out of the cake. I added 2 on the top and two on each side. Just stick the wires into the cake.

Your guests will be delighted as they cut into the cake to reveal the striped inside that matches the stripes on the outside.
Note: This post was originally written in 2014. It was updated in 2023 for clarity purposes.


