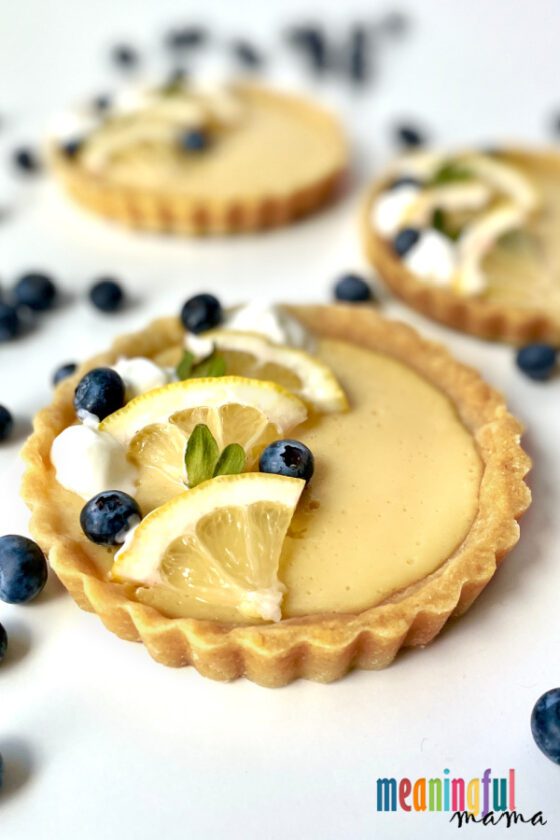
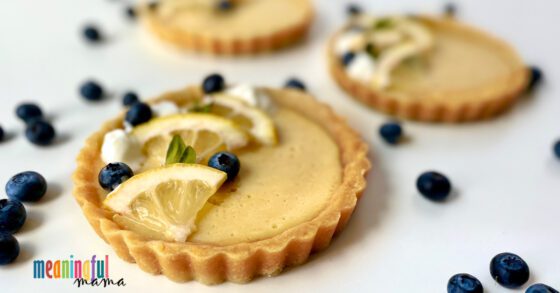
This beautiful lemon tart recipe delights in both flavor and presentation. With this step-by-step guide to creating a lemon tart, you can entertain like a professional baker.
Who doesn’t love lemon? Whenever a lemon dessert is mentioned I hear, “Oh! I just love lemon.” Me too!
This silky version of a lemon tart was inspired by this key lime pie recipe, which is a go-to favorite among family and friends. I decided to take the same concept and adapt the filling to create a tangy and smooth lemon tart recipe. It worked!
Beautiful Lemon Tart Recipe

I had a hard time deciding whether to call this a lemon tart or a lemon tartlet. I imagine a lemon tart being a large 9″ tart, while I think of tartlets being the tiny muffin tin size tarts, like these.
I’m not quite sure where this 4-inch tart fits into the mix. Looking at Google, there was a diverse array of posts with some of the 4-inch-sized lemon tarts being called tarts and some being tartlets. If you know for sure, will you let me know?
What Kitchen Tools Will I Need to Make These Lemon Tarts?
Amazon Affiliate links are provided for your convenience. Anything you buy in these links goes to support the free resources I provide at Meaningful Mama. Thanks for your support!
Most of the items you will need in your kitchen are essential items that many people have on hand. A couple of supplies are needed that some will not have in their kitchen. If you are wanting to make more individualized pies or quiches, these are great items to purchase:
Below I will explain the benefit of having pie weights for tart recipes.

Ingredients Needed to Make this Lemon Tart Crust
- 1 1/4 cup all-purpose flour
- 1/4 cup granulated sugar
- 1/4 cup powdered sugar
- 1/2 tsp salt
- 1/2 cup cold butter (1 stick), cut into Tbsp size chunks (I freeze my butter for about 15 minutes)
- 1 large egg
- 1 tsp vanilla (here’s a link to my favorite brand – quality vanilla makes a big difference in flavor)
Ingredients Needed to Make this Lemon Tart Filling
- 1 – 14 oz can sweetened condensed milk
- 2 large egg yolks
- 2 large eggs
- 1/4 cup sugar
- 1/4 cup powdered sugar
- 1/2 cup freshly squeezed lemon juice (juice from 2-3 lemons)
- 1 Tbsp lemon zest (zest from 1-2 large lemons)
- 1 tsp vanilla

Instructions for Making this Sweet Tart Shell
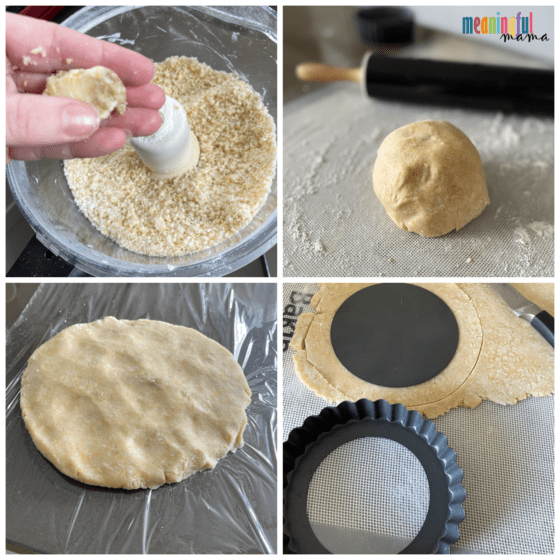
- In a food processor, combine flour, sugars, and salt and pulse 5 times to mix the ingredients.
- Add butter and pulse to fine crumbs. It will look like cornmeal.
- Add egg and vanilla and pulse about 20 times. Again, it will look like cornmeal. You will know it is done if you grab a small amount, squeeze it, and it becomes dough.
- If you do not have a food processor, you can do the first few steps with a pastry blender.
- Turn dough onto a floured surface. Press the ingredients together until it forms a dough ball.
- Press dough into a 1/2″ disc and refrigerate for 30 minutes or overnight. This dough can be refrigerated for 24 hours or frozen for a month. If frozen, defrost overnight in the refrigerator.
- Remove dough from the refrigerator, and set it on a floured surface. Make sure to flour your rolling pin also. Allow to thaw for a few minutes and then start to roll out your tart shell to 1/8″ thickness. Rotate while rolling to assure that tart is not sticking to a floured surface. Add more flour if needed.
- Using the bottom of your tart pan as a template, cut the dough almost 1″ larger all the way around than the bottom of the tart pan.
- Lightly press dough into the tart pan, coaxing it into the curves.
- Using a sharp knife, carve off excess dough from around the top edge. An alternative technique is to drape the extra pastry over the rim of the tart pan. Roll a rolling pin across the top to cut off the excess.
- Place in refrigerator for 30 minutes or freezer for 15 minutes. Cold dough prevents the dough from shrinking when baked.
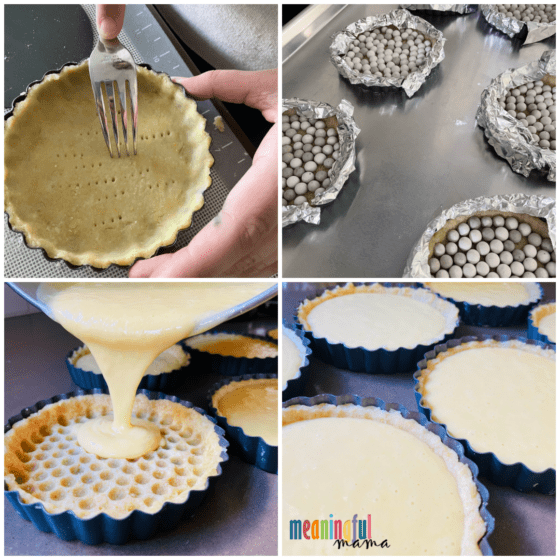
- Poke tart shell with a fork at the base and fill with pastry weights to prevent dough from puffing up. You can put the pastry weights directly on top of the tart but will get small round impressions. Alternatively, you can put a piece of parchment paper between the tart shell and the pie weights.
- For easy transfer in and out of the oven, put the tart pans on a large, edged baking sheet.
- Cover edges with foil and bake at 375 degrees for 20 minutes. Remove foil and bake for another 5 minutes or until lightly browned on the top.
- Remove from heat and cool completely. Carefully remove pie weights from the tart shells.
How to Make Lemon Tart Filling
- Preheat the oven to 275 degrees F.
- Combine all the filling ingredients in a large bowl, and whisk on high for 1-2 minutes until fully combined.
- Pour the mixture into the cooled tart shells.
- For easy transfer in and out of the oven, put the tart pans on a large, edged baking sheet.
- Bake for 17-20 minutes. The filling will still have a small wobble.
- Allow lemon tarts to cool completely. Place in the refrigerator and chill for four hours before serving.

How Long Can a Lemon Tart Be Out at Room Temperature?
Sugar is a natural preservative, so lemon tarts can be at room temperature. According to Daily Delish, fruit pies can be stored at room temperature for 2 days. That said, with the addition of eggs in this tart, I would only keep it at room temperature for a few hours. Refrigeration is ideal.
How Long Can I Refrigerate a Lemon Tart?
This lemon tart can be covered and refrigerated for up to 3 days.
Can You Freeze a Lemon Tart?
I have never frozen my lemon tarts. That said, Daily Delish says you can freeze a lemon tart for up to 3 months. That is pretty typical for cakes and pastries. The article says the quicker you can freeze the tart the fresher the results. To defrost, transfer the tart from the freezer to the refrigerator and allow 24 hours to thaw.
Can You Refrigerate or Freeze Tart Crust Dough?
Yes! Tart crust dough can be refrigerated for 24 hours, or you can freeze the dough for up to 3 months. Make sure the dough is wrapped securely in plastic before putting it in the freezers. The dough can be frozen as a 1/2″-1″ thick disk or can be pre-rolled, cut, and shaped into the tart, non-stick baking pans. Defrost the dough in the refrigerator for 24 hours before using.
Can you Refrigerate or Freeze the Baked Tart Crust?
Yes! Baked tart crusts can be refrigerated for up to 3 days. Make sure they are wrapped tightly so they do not dry out. They can be frozen for up to 3 months. Defrost in the refrigerator for 24 hours.

What is in this Beautiful Lemon Tart Recipe?
What makes my recipe unique from other lemon tart recipes is the sweetened condensed milk. I have seen others using cream and butter to form a lemon curd, but I love the end product with the sweetened condensed milk. Similar to other lemon tarts you see, this one has sugar, eggs, and freshly squeezed lemon juice (better than the store-bought option). The addition of the lemon zest adds to that tangy, tasty lemon flavor, but the vanilla mellows it out a tad.
Can this Lemon Tart be Made into a 9″ Recipe?
Yes. This recipe can be adapted for a larger tart pan. I would make sure to buy a non-stick 9″ tart pan with a removable bottom like this (Amazon Affiliate link). Check the filling at 20 minutes. It should have a slight wobble. If it is too loose, put it back in, and check every 3 minutes.
Can this Lemon Tart be Adapted to Become Lemon Tartlets?
Yes! If you are looking for bite-sized desserts that are a crowd-pleaser, use mini-muffin tins (Amazon Affiliate link) to make lemon tartlets. Put small scoops of the lemon tart dough into greased mini-muffin tins, and press the dough up the sides to make a little tart crust cup. Pour the filling into the tart crusts. Bake at 325 for 20-25 minutes or until the crust is golden. They should look similar to this. Makes 24 tartlets.
Why use Pie Weights?
Pie weights are used when blind baking (i.e. baking a crust before adding the filling) to prevent the bottom from puffing.
How Do I Decorate a Lemon Tart?
It’s inspiring to browse the internet for lemon tart decoration ideas. There are so many beautiful options available.
I chose to decorate with 3 dollops of whipping cream, four blueberries, 3 thinly sliced lemon pieces, and the greens from the top of a strawberry.
My failure in decorating was the whipping cream. I took a shortcut and bought store-made whipping cream from a can. I know better. Homemade whipping cream is so much better tasting and holds its shape better. This Reddiwhip became soupy almost immediately. I don’t own a whipping cream dispenser and didn’t think to get out my pastry bags and tips. I will do it differently in the future.
The tart inspiration photos I am using will be showcasing lemon tarts in a variety of sizes. Here are some more inspiration photos for how to decorate a lemon tart:
- Blueberries – Blueberries are always a gorgeous contrast visually but a perfect pairing for lemon. I used blueberries on my tart, but here is another beautiful way to decorate a lemon tart with blueberries. Lemon Tart with Blueberries Inspiration Photo
- Lemons – Why not decorate with what you baked with? Lemon Tart Decorated with Lemons Photo
- Raspberries – This is another amazing flavor combination with contrasting colors. Lemon Tart Decorated with Raspberries Inspiration Photo
- Strawberries – Here is yet one more great flavor combination. Lemon Tart Decorated with Strawberries Inspiration Photo
- Mixed Berries – Mixed berries provide a beautiful display. Lemon Tart Decorated with Mixed Berries Inspiration Photo
- Whipping Cream – Whipping cream is always a beautiful flavor combination and decorative option for a lemon tart. Lemon Tart with Whipping Cream Inspiration Photo
- Meringue – Meringue is a type of sweet made from whipped egg whites and sugar. They are crisp yet pillowy bites. Torching the top adds great dimension and flavor. They are great for decorating. Check out the meringue ghosts on this Halloween pumpkin pie. Lemon Tart with Meringue Decorations Inspiration Photo
- Herbs – Herbs bring a natural green and some fun flavors to a lemon tart. Rosemary, mint, thyme, and basil are all options. Lemon Tart with Rosemary Inspiration Photo
- Edible Flowers – Edible flowers (Amazon Affiliate link) are absolutely gorgeous on desserts. Lemon Tart with Edible Flowers Inspiration Photo
- Powdered Sugar – Powdered sugar is an ingredient that is often readily available in kitchens. It is a simple way to make tarts beautiful. Lemon Tart Decorated with Powdered Sugar Inspiration Photo
- White Chocolate Garnish – The inspiration photo I’m sharing elevates a lemon tart to a whole new level if you want to go fancy. Lemon Tart Decorated with White Chocolate Rings
- Chopped Nuts – Chopped nuts like pistachios are a beautiful way to decorate. Lemon Tart Decorated with Pistachios

Beautiful Lemon Tart Recipe
Ingredients
- 1 1/4 cup all-purpose flour
- 1/4 cup granulated sugar
- 1/4 cup powdered sugar
- 1/2 tsp salt
- 1/2 cup cold butter cut into small cubes (I freeze my butter for about 15 minutes)
- 1 large egg
- 1 tsp vanilla
- 1 – 14 oz can sweetened condensed milk
- 2 large egg yolks
- 2 large eggs
- 1/4 cup sugar
- 1/4 cup powdered sugar sifted
- 1/2 cup freshly squeezed lemon juice juice from 2 lemons
- 1 Tbsp lemon zest zest from one large lemon
- 1 tsp vanilla
Instructions
- In a food processor, combine flour, sugars, and salt and pulse 5 times to mix the ingredients.
- Add butter and pulse to fine crumbs. It will look like cornmeal.
- Add egg and vanilla and pulse about 20 times. Again, it will look like cornmeal. You will know it is done if you grab a small amount, squeeze it, and it becomes dough.
- If you do not have a food processor, you can do the first few steps with a pastry blender.
- Turn dough onto a floured surface. Press the ingredients together until it forms a dough ball.
- Press dough into a 1/2 disc and refrigerate for 30 minutes or overnight. This dough can be refrigerated for 24 hours or frozen for a month. If frozen, defrost overnight in the refrigerator.
- Remove dough from the refrigerator, and set it on a floured surface. Make sure to flour your rolling pin also. Allow to thaw for a few minutes and then start to roll out your tart shell to 1/8″ thickness. Rotate while rolling to assure that tart is not sticking to a floured surface. Add more flour if necessary.
- Using the bottom of your tart pan as a template, cut the dough almost 1″ larger all the way around.
- Lightly press dough into the tart pan, coaxing it into the curves. Using a sharp knife, carve off excess dough from around the top edge. An alternative technique is to drape the extra pastry over the rim of the tart pan. Roll a rolling pin across the top to cut off the excess.
- Place in refrigerator for 30 minutes or freezer for 15 minutes. Cold dough prevents the dough from shrinking.
- Poke tart shell with a fork at the base and fill with pastry weights to prevent dough from puffing up. You can put the pastry weights directly on top of the tart but will get small round impressions. Alternatively, you can put a piece of parchment paper between the tart shell and the pie weights.
- Cover edges with foil and bake at 375 degrees for 20 minutes.
- Remove foil and bake for another 5 minutes or until lightly browned on the top. Remove from heat and cool completely. Carefully remove pie weights from the tart shells.
- Preheat the oven to 275 degrees F.
- Combine all the filling ingredients in a large bowl, and whisk on high for 1-2 minutes until fully combined.
- Pour the mixture into the cooled tart shells.
- Bake for 18-20 minutes. The filling will still have a small wobble.
- Allow lemon tarts to cool completely. Place in the refrigerator and chill for four hours before serving.


I was gifted fresh raspberries and wanted to make mini tarts. I remember that I saw this post, so used the tart crust recipe. The subtle sweetness was a perfect match for the semi-tart berries and the dough was perfect for a lattice top. Thank you meaningful mama!
Thanks so much for the great review. So glad it worked out for you. Adding a star rating would be super helpful if you were willing. Appreciate it!