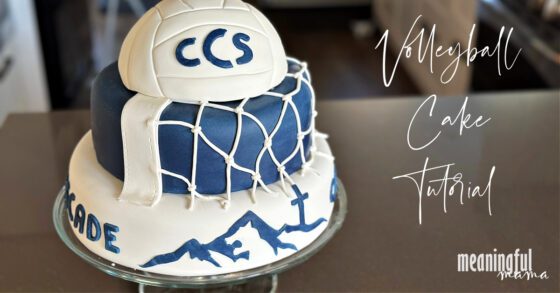
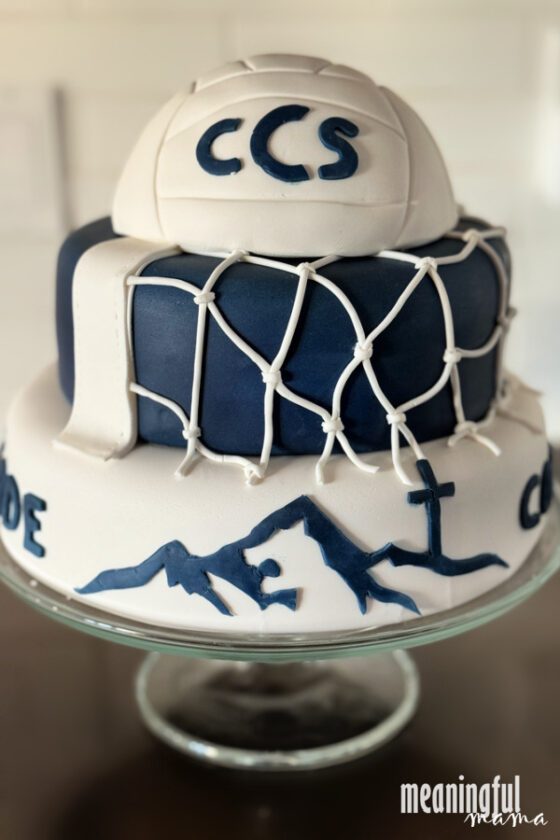
To celebrate the end of a terrific season, I designed this beautiful volleyball cake for my daughter’s team. I will talk you through how to create a volleyball cake for your team. Using a team logo combined with classic volleyball elements, including a cake ball on the top, added to the design.
Want more information on how to make an athletic ball cake? Check out my son’s basketball cake.
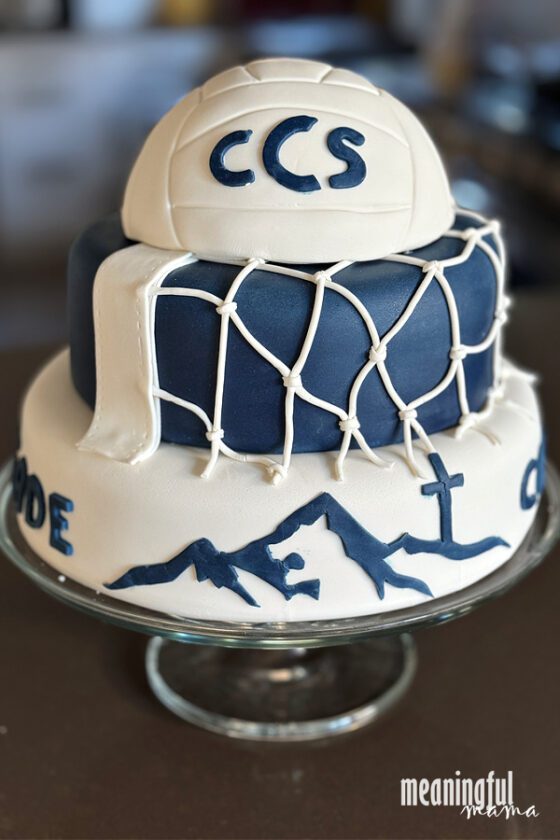
Beautiful Volleyball Cake
If you’re a sports enthusiast or have a volleyball lover in your life, creating a volleyball cake is the perfect way to combine the sweetness of baking with the excitement of the game.
In this step-by-step guide, I’ll dive into the art of crafting a stunning sports cake that not only looks impressive but also tastes delicious.
From choosing the right recipes to mastering the essential techniques, I’ve got you covered.
Let’s spike up your baking skills and serve an ace with this volleyball cake tutorial. See what I did there? Take the instructions and concepts provided to adapt to any sports-themed celebration!
The Basics of Cake Decorating
Note: This post contains Amazon affiliate links for your convenience. Anything you purchase through these links helps support the free resources found here at Meaningful Mama. Thank you for your support!
If you are new to cake baking and decorating or even if you have experience, I have some great tips and tricks to make cake making a more flawless experience. Check out my Cake Making 101 and Cake Making 201 tutorials.
Another important aspect of cake decorating is having the right tools. I created a supply list for anyone wanting to take this hobby or career further.
The final important part of cake baking is having your favorite go-to recipes. I have a handful of cake recipes on this site, but for this particular volleyball cake, I used two of my favorites: My White Velvet Cake (semi-homemade) and Classic Buttercream Frosting recipe.
This particular cake had a two-layer 10″ cake, 8″ cake, and cake baked in an oven-safe 6″ glass bowl.
How to Make a Volleyball Cake
Now that you have some of the basics in line, it’s time to share how to make your own custom volleyball cake. Unless your child happens to be on my daughter’s team, your cake will look different than mine. The school colors and logo will be different. This post is intended to be an inspiration and give a skeleton for your own design.
For this cake, I purchased my favorite brand of white and navy blue fondant.
The Bottom Tier
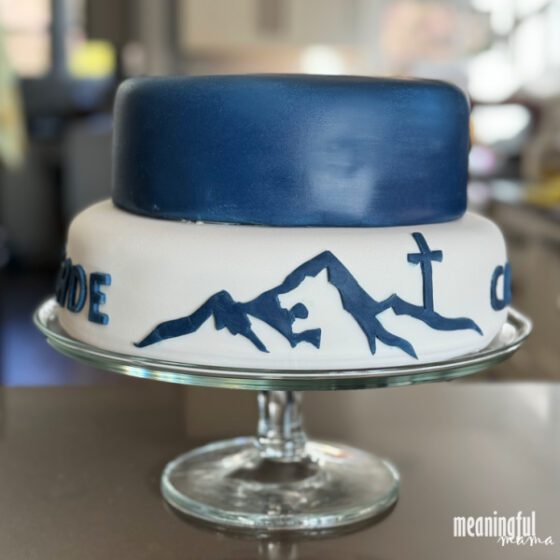
The bottom tier of this cake consisted of the school logo and name. Both sides have the name of the school. The front and the back have the logo.
For the name, I used letter cookie cutters, which make things very cohesive and neat. Using a nine-inch fondant roller with ring guides, roll out fondant in school colors to the smaller ring size (I believe it is 1/8 inch thick). You can use a normal roller too, I just love how consistent I can make the thickness of the fondant when I have the guides. Cut out letters.
If you don’t want to use cookie cutters for your letters, you can download the exact font your school or team uses to create a perfect match to the logo. If you choose that option, follow the next steps for cutting the letters.
I definitely regret not taking photos of the next step. Apparently, I was too focused on getting it done. However, I want to provide instructions.
- Print out the school or team logo to size. Trim logo to general size.
- Put fondant on a cutting mat, sprinkled with powdered sugar to prevent from sticking. Roll out the fondant thin using your roller with ring guides to 1/8 inch thick.
- Lay the print-out logo on top of the rolled-out fondant. If you can do this on a surface you don’t mind pinning into (like a wood cutting board), stick pins can help keep the paper logo in place. Alternatively, you can tape the paper down over the fondant so it doesn’t slide while you work.
- Using an Exacto knife, cut through the paper logo and through the fondant, following the design of the logo until it is completely traced/cut out. Below I will share a good video tutorial about how to do this.
Once your logo and letters are completely cut out, allow them to dry slightly. Too much, and it won’t bend around the cake as desired. Not enough and it might not hold the shape and design you want.
Apply a very small amount of water with a small, clean cake decorating brush. Adhere to the cake in the location desired. If you use too much water, the color on your fondant will bleed, so you really just want a slightly damp brush.
The Middle Tier
I love how the middle tier turned out. The draped volleyball net was classic.
Cover your middle tier in a darker team color of fondant. Because I roll out my fondant on powdered sugar as my non-stick agent, the color can look dull and have white specks. I brush most of this off, but one trick to making a clean, shiny surface is putting a small amount of Crisco on a paper towel and lightly rubbing it over the fondant surface.
The next step is to roll out a piece of your white fondant to the diameter of your cake plus the 2 side heights of your middle tier. For me, it was 8″ + 3″ + 3″. The strip you are cutting is the top of the volleyball net, and it will be about 2″ wide. You will need two of these strips cut.
Lay one of the strips across the cake. I had the net covering about 2/3 of my cake.
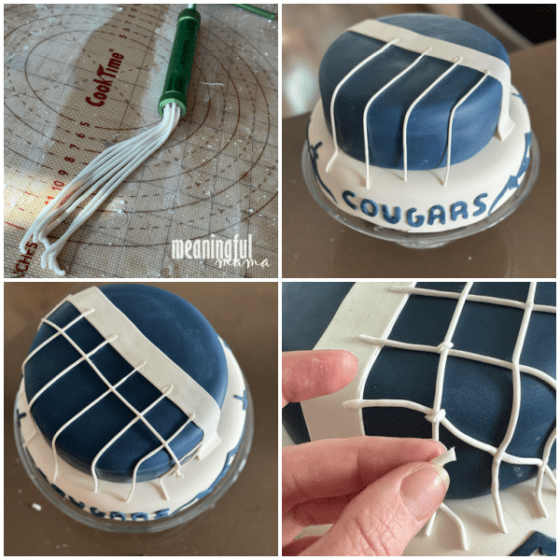
To make the volleyball strings, you will need a clay extruder tool. Choose the extruder top that features several different holes. Stuff fondant into your tube and twist the handle to create strings.
Using a little bit of water and a small decorating brush, attach each string along the fondant strip about 1.5″ apart. Next, lay strips perpendicular to your initial strings. Pressing the two together will help keep them in place.
Cut a tiny piece of the string to create a little string to place over the place where the strings intercept, as shown in the bottom-right photo above. Do this where each string crosses.
The final step is to place your other strip of 1.5″ fondant directly on top of the other to sandwich in the strings that attach to the strip. I used a cake quilting tool to add a stitching detail to the strip.
The Top Tier
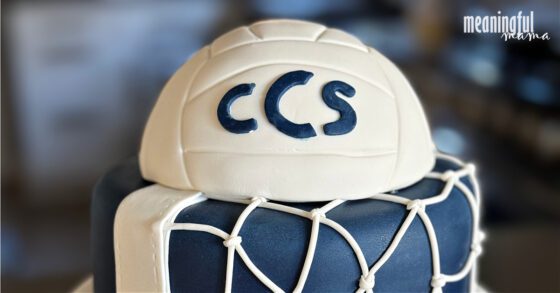
The top tier should have been baked in an oven-safe glass bowl and covered in white fondant.
The hardest part for me was trying to figure out how to draw the lines of the volleyball. I used the other side of the quilting tool to impress my lines in the fondant.
To help with my design, I looked at a graphic of a volleyball. This image was the most helpful. I also had a real ball – so a 3D version of what I was trying to recreate. Then, I tried to hand sketch my pieces to puzzle together in a way that made sense. I’m not convinced that the back was perfect, but it looked pretty close on the front and sides. I traced my cut-out pieces using a fondant tool.
The final step was to put our school initials on the center of the top tier.
When stacking cakes, I always use plastic boba tea/smoothie straws as my dowels because they are easy to cut and very stable.
There you have a beautiful volleyball cake to serve at your team celebration. I hope you found this cake-decorating tutorial helpful.
Want More Fun Cake Ideas?
